Friday, May 29, 2009

Mock Croc & Peek-a-boo Baby Sandals

Mock Croc Baby Sandals Pattern
These turned out so cute. I had just bought a pattern from Etsy when I found this one for free. I need to try the boughten pattern. I haven't put buttons on yet. I bought some cute ones from Walmarts.

You can get the mock croc pattern here


The adorable Peek-a-boo Sandals are also made in Worsted Weight Yarn. She has a bunch of sizes too, from 3.5 inch soles to 5 inches. This pair I made using a G Hook.

You can get this pattern here

Thursday, May 28, 2009

Meet My New Darling Grand-daughter Camryn

Meet My New Darling Grand-daughter Camryn

I was gifted from my oldest son and his wife, with this lovely jewel last week. She is Camryn Jayelle, weighing in at 5 lbs 5 ozs, and a total of 18 inches. She is so sweet natured, she doesn't cry yet, just an adorable squeak. Here's my hubby holding her at her sister's graduation party. She totally ignored the teenagers and was quite happy to be held by all the adults.
The teenagers had taken a new course at their school, called Life-course. They are presented with a lovely electronic baby that is programmed to react just like a real baby. They are graded on how well they parent this vinyl baby. Needless to say every girl at the graduation party knew exactly what to do in any sort of emergency with a child. I wish we had had those classes back in my day.
The downside, was that there wasn't a single girl there that wanted to have children any time soon. I am afraid we might have an entire generation waiting until after they are thirty to start a family.

Green Seraphina Shawl Finished

Green Seraphina Shawl
Close-up of the center stitches.
This shawl I tried using the smaller size K Hook. In this picture you can see the difference. It was still made
with JoAnn's Sensations Rainbow Boucle. I do love that yarn. I think I am going to make a bunch of these
shawls up for gifting to friends that are hospitalized.


I am working on one made in Hobby Lobby's I Love This Yarn, for my Daughter-in-Law, who gets chilled,
breast-feeding late at night.


Boston Creme Pie Cupcakes

Boston Creme Pie Cupcakes

The Mommy's Kitchen Cooking Blog never fail me when I need something special. These are for my oldest sons birthday. He has always adored Boston Creme Pie, so I tried the cupcakes so the would travel better. They were wonderful. One tip, if you buy the Wilton Squeeze Bottles to fill these, cut the tip down to open it up father. You can see what happens when to much pressure and too much filling. Also the filling makes enough for 2 batches.


I used the quickie canned frosting too. Quick and Easy.


You can find the recipe here.

How to Make a Diaper Cake For Baby's Shower - Part 1

PART 1

Making a Baby's Diaper Cake Tutorial


1 Serving Round Platter, ( I got this one at the Dollar Tree)

1 Small Stuffed Toy to be your Topper1 Plastic Baby Bottle

1 Lg Package Baby Disposable Diapers

1 Stem Flowers1 Roll

1 - 1 1/2 inch Satiny Ribbon ( no see through type)

1 Roll 1 1/2 - 2 inch French Wired Ribbon

Rubber Bands including 2 Large Ones

Glue Gun


Lots of Goodies to tuck and tie onto your Cake

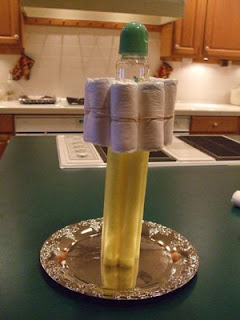
1. To start gather up your glue gun, 1 large package diapers ( this one has 56 jumbo newborns) your serving dish, ( I got this one at Dollar Tree, it was about 11-12 inches diameter.) Either a cardboard core, or I prefer to use a swimming noodle. Cut your noodle (One will make about 4). This makes a very sturdy cake that can even be mailed.

2. Make sure your glue gun is hot, and get your platter and cut noodle.


3. Hot Glue your noodle or cardboard to the center of your serving dish. Make Sure you are Centered.


4. Roll your diapers, starting from the short side and the open edge.

Continue to Part 2


How to Make a Diaper Cake For Baby's Shower - Part 2

Part 2


5. Rolled Diaper.


6. Roll your entire package of diapers the same way.

7. Take Your Plastic Baby Bottle, the Tall Kind. (Again Dollar Store)


8. Put 8 of your rolled diapers around the bottle.


9. Put a rubber band around the entire group and bottle. You can sort of see how we are building this one.

Back to Part 1

Continue to Part 3

How to Make a Diaper Cake For Baby's Shower - Part 3

PART 3

10. You will need 2 of the larger thin rubber bands.


11. Put one of the larger bands over the center pole, see pic.


12. First Layer, Start putting diapers around your center,


13. Add your diapers by tucking them in the rubber band to hold.


14. Keep Adding diapers until you pretty much fill the base of your platter.

Back to Part 2

Continue to Part 4

How to Make a Diaper Cake For Baby's Shower - Part 4

PART 4

15. Make sure to turn all the edges into the center cake.

16. Second Layer, put your second rubber band on the pole and again start adding diapers, I try and match the bottom layer.

17. You may need to cut down your yellow noodle so the bottle tucks about 2 inches into the second layer.


18. Again make sure all diaper edges face in and that the rubber bands are in the same area so a ribbon will cover them.


19. Use Baby Spoons between layers, not only as a nice surprise,

Back to Part 3

Continue to Part 5

How to Make a Diaper Cake For Baby's Shower - Part 5

PART 5


20. but to give you cake extra strength.


21. Pick a 1 - 1 1/2 inch, non see-through ribbon.


22. Pre Measure your ribbon to go around each layer. Cut. Carefully glue ribbon to itself not to the diapers.

23. Glue ribbons around each Layer.


24. Pick a small Cake Topper. (This was another Dollar Store Find.)

Back to Part 4

Continue to Part 6

How to Make a Diaper Cake For Baby's Shower - Part 6

PART 6


25. Attach your stuffed toy around the bottle, using rubber bands to attach arms together and even legs. You want it on good and tight, especially if you are going to mail it.

26. Gather up all the little baby goodies you have bought to decorate the cake. I try to stay with a theme. Tie small ribbons that are long enough to tie the goodies to the main ribbon, or around the top of a diaper. I generally buy a couple Dollar Tree Bibs to put on the back. You can just attach them around a diaper on the top tier. They will cover the back, and it will take less goodies to make the cake look full.


27. You can buy the Dollar Store little washcloths, and put a tight rubberband around the center. tuck one end in-between the diapers. The rolled end looks like roses.


28. Next Cut all your flowers off your big Stem, using wire-cutters. Leave about a 4-5 inch stem on each one. Push the green leaves up close to the top.


29. Add Your Flowers like you would on a real cake. Filling in blank areas.

Back to Part 5

Continue to Part 7

How to Make a Diaper Cake For Baby's Shower - Part 7

PART 7

30. Make a simple bow with your wired ribbon, by just cutting about 12 inches of ribbon, folding it from each end so it crosses. Use florist wire to wrap tightly around the center.. Leave about a 4-5 inch twisted wire so you can tuck it between diapers..


31. Leave about a 4-5 inch twisted wire so you can tuck it between diapers.. Place Your bows around the cake, again filling in empty spots.

32. If you are sending the cake or taking your cake as a gift to a shower, it looks lovely with a Basket Shrink Wrap over it. I Used the 30" tall x 30" wide one, from Walmarts. I didn't shrink any of it.


33. Diaper Cake Finished

Back to Part 6

How to Make a Diaper Cake For Baby's Shower - Part


PART 8


34. Here it is from the side.

35. Here it is from the back, note the bibs.


36. Perfect centerpiece, perfect gift. Any Questions, just let me know.

The End

If you need any clarifications, just let me know.


Back to Part 7

Sunday, May 24, 2009

Seraphina Shawl in Black Sensations Rainbow Boucle

Seraphina Shawl in Black Sensations Rainbow Boucle

My very first, which definitely won't be my last. This first one was made using the full 11oz. skein. I love this
yarn, even though I was a bit nervous after hearing others complaining about it. The pattern became easy if
you just follow the chart, and don't read the directions.
This was made with Black Sensations Rainbow Boucle and and N Hook. I have already begun one in
Green Sensations Rainbow Boucle with a K hook.
The finished measurements to the black Seraphina Shawl is: from neck to bottom tip is approx 26 inches
and from side tip to side tip is almost 6 feet.


You can find the pattern here.